It is important to record the customer’s opinion and experience to track the outcome of a process or service. One of the ways to record the customer response is through survey or feedback form. Have you ever thought about how recording the customer response happens in PEGA? Let’s explore how PEGA handles this…
This article illustrates how the customer response is recorded through SURVEY in PEGA.
Example Scenario :
ABC is a training academy which offers various domain/ technology based training to candidates. To improve their training standard, they decided to record the customer’s response & expectation about the training. They are seeking a right platform to satisfy their requirements. PEGA achieves this, by launching a post training survey. Let’s explore how this magic works…
CONFIGURATION:
Step 1:
Create the survey by following the path : Configure—>Case management—> Survey

Click on create survey and label as “Training Analysis”. Click submit.

After creating the survey, Click Save.

Step 2:
As soon as the survey is created, refresh the case explorer to view the automatically created “Training Analysis” casetype. Open it and create a Question Page and add it to the survey. Click on “Add survey item→ SurveyItem.

.
Now it’s time to include the questionnaire. There are two possible ways to include the questions in the survey:
- They can be added as an individual question.
- They can be added as a question set under a question page.
We are implementing the second way. That is, creating a questionnaire under the question page.
Create a Question Page and add it to the survey by clicking on “Add survey item→ New Question Page.

Hurray!! The new question page is created. Now it’s time to configure the need of an hour- “ The post training survey questions”…
Step 3 :
Click on Add question→New to create questionnaire

Change the title as “Please Fill The Details “ choose the property type as “Picklist” and provide the question.

Under the picklist options, provide the possible answer options for the question.
Note : Since the Rich Text Editor is used, the text font, size, colour can be customised. Here we have used,
Text Font : Cosmic Sans Ms
Size : 14
Colour: Blue
In the similar way, Click Add question to add as many questions to the same question page.
Step 4:
Choose the property type as “Multi-textboxes” and provide the question.
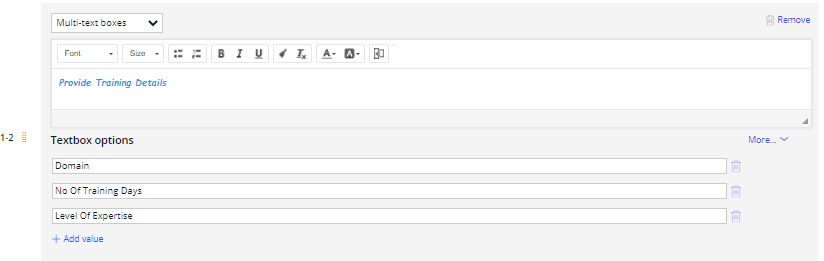
Under the textbox options, provide the data which you are planning to collect from the customer
Step 5 :
Choose the property type as “Radio-button matrix” and provide the question.

Sample Representation of Radio-button matrix type :
| Excellent | Good | Better | Poor | |
| Infrastructure | ||||
| Trainer Proficiency | ||||
| Content Delivered | ||||
| Comfortable in handling assigned-task |
Step 6:
Choose the property type as “Checklist” and provide the question.
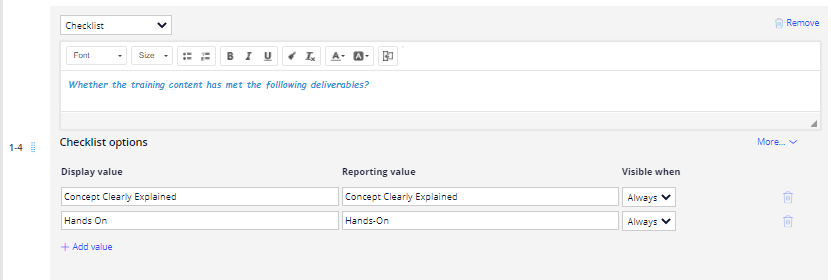
Under the display values, Provide the checklist values which you wanted to ensure from the customer whether it has been covered during training session .
Step 7:
Choose the property type as “Slider” and provide the question.

On the question settings, Provide the starting & ending range of the slider along with the interval of separation between start and end.

Enable the “ Show Captions “ for displaying the numeric values below the sliding bar.
Step 8:
Choose the property type as “Build a list “and provide the question.

This allows the customer to add “N” number of answers to the question.
Step 9:
Choose the property type as “Text Paragraph” and provide the question.

Click Save..
Note : You can add N number of questions to the single question page and you can also create N number of question pages to a single survey.
Hurray!! The Implementation part is done. Let’s run and check.
Output Image :
The Following images represents the survey form filled by the customer.
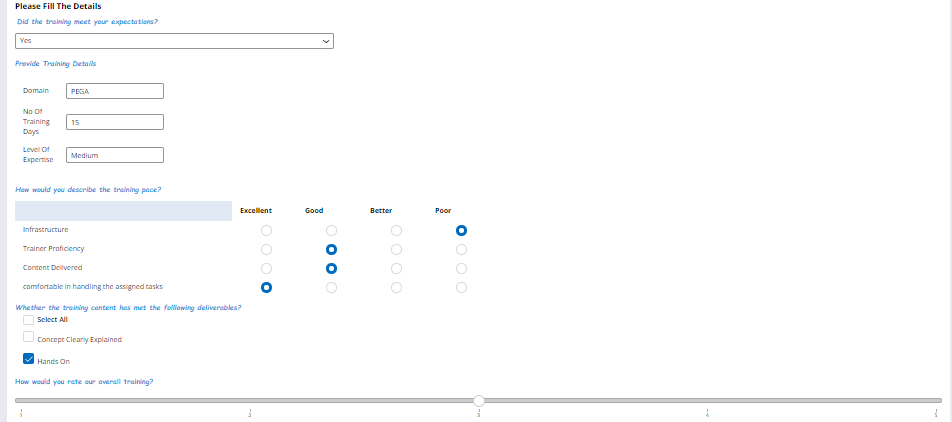

Let’s check with the clipboard. The survey data is recorded under pyQuestionGroup of pyWorkPage.

Happy Learning!!!
Youtube Video: